Basic Grooming Equipment

The following information is used with the kind permission of Marie Burns (Burneze), with the drawings created by Kirsten Fox (Hillsted)
West Highland White Terrier - Hand strip
Coat Textures
Not all West Highland White Terriers can be hand stripped.
Some Westies do not have the correct coat texture, this is mainly due to bad breeding. You will see a variety of incorrect coat textures in your grooming salon. The correct coat for a Westie is described as,
Double coated: Outer coat consists of harsh hair, about 5 cms (2 ins) long, free from any curl. Undercoat, which resembles fur, short, soft and close.
You will see a variety of harsh coats, all of which can be hand stripped. Some Westies have silky coats with no undercoat, some have a very fluffy coat & some very wavy. These coats will be very hard for the groomer to pull out and will also hurt the animal.
1st Trim (puppy trim)
A puppy can be stripped out for the first time at approx 16 weeks old. I personally would take everything out that will come out at this stage. This includes the head & leg hair. The puppy may look a bit strange for a few weeks but this will allow the new coat to come back in thicker & harsher. This would be the only time I would strip everything out. I would then leave the coat to come in for about 6-8 weeks before doing any more stripping on this puppy.
What you have to realise is that for the first 3-4 grooming sessions the coat is not going to look perfect when leaving your salon. The purpose of these first grooming sessions is to set the coat up (get it rolling) . Except for the first ever groom you do not want to strip everything out on a Westie as you will be down to the undercoat again and the coat will all grow back in at the same length. We are trying to get 3 different lengths of coat coming in (rolling the coat) so each time the dog comes in to be trimmed you take the top layer off, the second layer lies flat to the dogs body (the finished look), and the third layer is just coming through which will give thickness & body to the coat.
The 2nd session
Body (green area)
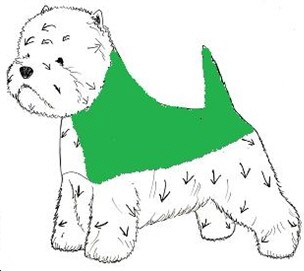
Now we want to get the coat rolling. The best way to do this is strip the dog’s neck, back & sides again (the green area) but only pull a few hairs, keep moving around so you don’t stay in the same place and make a hole. All you are doing is thinning the coat out all over the body. You want to remove about a 3rd of the thickness.
Blending (red area)
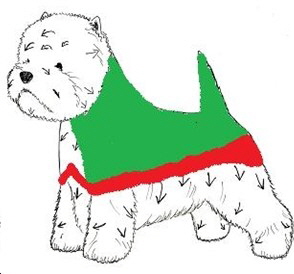
Now you want to blend the short body coat to the long skirt & furnishings. This part will be the same every time the dog comes to be groomed. You need to thin this area out by pulling a few hairs at a time, again by moving around and not staying in the same place. It should be made up of long & short hair which gives you the graduation between the short body & long furnishings. You don’t want to go under with the rib cage, the graduation should take place on the widest point of the ribs so the hair flows straight down to the floor with nothing sticking outwards. When viewed from the front or rear nothing should stick out on the sides.
The Legs (blue area)
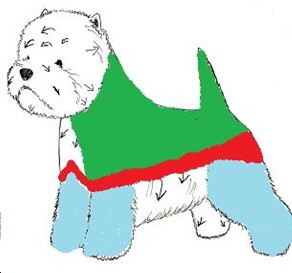
You want to keep the leg hair full (blue area), but at the same time keep the good harsh texture. The best way to do this is pull a few hairs all over the leg and I mean a few, probably 20% of the volume. You can use thinning shears to shape the leg and achieve the finished look after you have stripped some of the coat out. You must however strip some of the coat on the legs as using thinning shears alone will encourage the coat to go thin & soft. If the dog has a very harsh coat you may be able to achieve the finished look by hand stripping alone, but most people do use thinning shears to tidy the legs up. Thinning shears would also be used to shape the foot.
The Skirt (blue area)
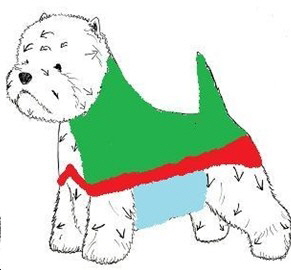
You should pull a very small amount of skirt (blue area) out to keep the coat thick & harsh in texture, but remember only a very small amount. The skirt is just a longer version of the blending area. The sides should be made up of different lengths. It should not look all the same length from the rib cage down to the floor. A Westie’s skirt should slightly taper up from front to back. This can be done with thinning shears, or some breeders will use a stripping knife to snap the ends to tidy the skirt up (A bit like pulling a horse’s mane). You want all the thinning shear work to look as natural as possible, it should never look like scissors have been used. We are not looking for straight lines we want the coat to look like it grew this way. The length of skirt required for each dog depends on the overall balance of the dog i.e. a little dog only needs a short skirt, a taller dog needs a longer skirt.
The Chest area
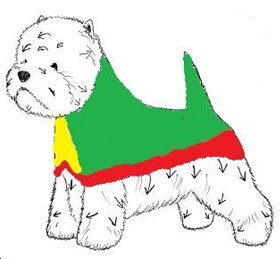
The chest (yellow) area can be hand stripped. This area is very tender and if the dog objects then thinning shears can be used.
The Head
This is probably the hardest part on the Westie. What will make the biggest difference on how well you can trim the head is probably the bone structure of the dogs head in the first place.
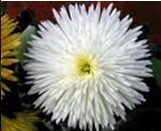
The head of a Westie should resemble a Chrysanthemum
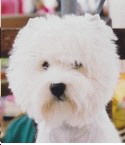
The tips of the ears can be trimmed with scissors, but only the very tip (as seen in the picture above). The head hair should be thinned by hand stripping approximately 20% of the thickness out. This again will keep the coat coming in thick and harsh. With a very harsh coat you may be able to achieve the desired look by hand stripping alone. In most cases thinning shears can be used to trim around the head to achieve the Chrysanthemum shape.
Products can be used to hold the hair in place then, trim around the very edges with thinners. Look at the head from every angle. It should be round in shape from wherever you stand. Around the eyes & the top of the nose is best hand stripped, this will look more natural. This head shape is easier to achieve on a harsh coat, on soft, silky coated dogs the hair will flop so hand stripping some coat out on a regular basis is very important.
Tail
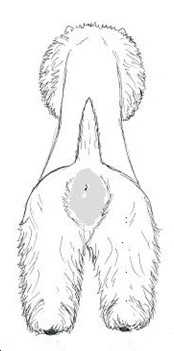
The tail should be (5-6 ins) long, covered with harsh hair, no feathering, as straight as possible.
Hand strip the tail hair then thinning shears can be used to tidy up. The tail on a Westie should resemble the shape of a carrot, thick at the base and tapering to a point at the top.
Thinning shears can be used around the anus to tidy this area.
3rd Session (4 Weeks Later)
Repeat the whole grooming process again this time removing 50% of the long body coat. Follow the grooming procedure for the rest of the body parts.
4th session (4 Weeks later)
Repeat the grooming process as before and this time you will be removing the remaining long hair on the body and should now have a new harsh coat underneath.
You now have your rolling coat, with 3 different lengths of coat coming in. Every 4 weeks take the top layer off and a new harsh coat should be underneath. Follow the grooming procedure for the rest of the body parts.
When I talk about a rolling coat I am referring to the area marked green on the drawing, also referred to as the Jacket.
A Quick recap...
First Groom
The first groom at 16 weeks, remove all the top coat even on the legs and head. This can also be done on an adult being hand stripped for the first time or a dog that has not been groomed for months.
2nd Groom (6-8 weeks later)
Only take out a 3rd of the body hair (green area), and follow the routine for the other parts of the dog.
3rd Groom (4 weeks later)
Take out 50% of the remaining long hair on the body (green area) and follow the routine for the other parts of the dog.
4th Groom (4 weeks later)
Take out the remaining long hair on the body (green area) and follow the routine for the other parts of the dog.
I would recommend a Westie be hand stripped every 4 weeks. You will have to rely on your own judgment with some dogs as all coats grow at a slightly different rate.

